Box and Whisker Chart
This chart type belongs to PowerCharts XT.
A box and whisker chart is a statistical chart that is used to examine and summarize a range of data values. It shows a frequency distribution of the data that helps in interpreting the distribution of data. It draws a statistical conclusion for the given data using the five number summary principle. The box and whisker chart is very useful to observe the mean, median, upper and lower quartiles, deviations, etc. for a huge set of data. It is used mostly used in chemical industries and weapon industries.
Features
The distinct features of a box and whisker chart include:
It calculates the mean, median, upper and lower quartiles, and the minimum and maximum numbers for a given set of data.
It calculates and displays the mean deviation, standard deviation, and the quartile deviation for a given set of data.
It uses an interactive legend to distinguish between two data-sets by highlighting each data-set with different color strips.
It connects the mean and deviations of multiple sets of data by drawing a line.
It shows outliers - any value which is not residing within the set of values provided.
Five-Number Summary Principle
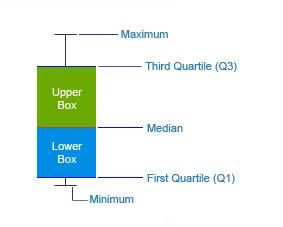
The five-number summary principle is used to plot data on the box and whisker charts. This principle helps to provide a statistical summary for a given set of numbers. It gives information about the range (minimum and maximum numbers), the center (median), and the spread (upper and lower quartiles) for the set of values provided. A simple illustration of a box and whisker plot is given below:
There is another principle, named as the 'Seven-number Summary' which is not used in the current implementation.
On a box and whisker chart, three out of the five summary numbers are displayed by default (median, minimum number, and maximum number). You can also opt to display the other two summary numbers (upper and lower quartiles).
Apart from the five summary numbers the box and whisker chart allows you to display the following statistical figures on the chart:
Mean
Mean Deviation
Standard Deviation
Quartile Deviation
Outliers
To execute the five-number summary principle, we use the quartiles method. Using this method, a set of numbers is divided into four equal parts by three quartiles - Q1 (lower quartile), Q2 (median), and Q3 (upper quartile).
There are two other methods, Deciles, and Percentiles, that are used to execute the five-number summary, which has not been used in this implementation.
We will now look at some of the formula that are used to plot data on a box and whisker chart.
All the formula are calculated after sorting the provided set of data in ascending order.
Mean
Mean is the usual average. The formula to calculate the mean is ΣXi /N, where N is the total number of elements in a set of data, X is the data points or values present in the set of data, and i is the position of the values.
Median (Q2)
To find the median, you will first need to arrange the given set of data in ascending order (from the smallest to the greatest number). The element that resides in the center-most position is said to be the median. This is easy to derive when the set of data contains an odd number of elements. You can also use the formula (N+1)/2 to find the position, where N is the number of elements in the given set of data. But if the set of data consists of even number of elements, you get two middle positions. The average of the two numbers residing in the middle gives the median.
Lower Quartile (Q1)
The median divides the data into a lower half and an upper half. The lower quartile is the middle value of the lower half, i.e., the element between the minimum number and the median. The formula to find the position of the lower quartile when there is odd number of elements is (N+1)/4, and for even number of elements it is N/4.
Upper Quartile (Q3)
The upper quartile is the middle value that resides between the maximum number and the median. The formula to find the position of the upper quartile when there is odd number of elements is (3N+3)/4, and for even number of elements it is 3N/4.
Mean Deviation
Mean deviation is the average of the absolute differences between each value and the mean. It gives us an idea of how spread out the set of values is from the center. The formula to calculate the mean deviation is Σ|Xi - mean|/N, where N is the total number of elements in a set of data, X is the data points or values present in the set of data, and i is the position of the values in the set of data. For grouped data, the formula is Σf |Xi - mean|/N, where f is the frequency of occurrence.
The process to calculate mean deviation is:
Calculate the mean, i.e., the simple average of the given set of data
Subtract the mean from each number
Work out the mean (average) of those differences
Standard Deviation
Standard deviation is the measure of the dispersion of the values in a set of data from the mean. It gives an idea of how spread out the set of values is from the mean. The more spread apart the data, the higher is the deviation. The formula to calculate the standard deviation is √ (Σ(Xi - mean) ²/N), where N is the total number of elements in a set of data, X is the data points or values present in the set of data, and i is the position of the values in the set of data.
The process to calculate standard deviation is given below:
Calculate the mean, i.e., the simple average of the given set of data
Subtract the mean from each number and square the result
Work out the mean (average) of those squared differences
Take the square root of the whole result
Quartile Deviation
The distance between the upper quartile and the lower quartile is called the interquartile range. Quartile deviation is half the distance between the two quartiles, i.e., half the interquartile range. It is also called as the semi-interquartile range. The formula to calculate quartile deviation is (Q3-Q1)/2.
Create a chart
As an example, let's create a box and whisker chart that shows the gender-wise distribution of annual salaries. In the chart, note that the minimum and maximum values and the median will be displayed by default, whereas the upper and lower quartile values will be hidden.
To create a box and whisker chart, keep a note of the steps given below:
Specify the chart type using the
typeattribute. To render a box and whisker chart, setboxandwhisker2d.Set the container object using
renderAtattribute.Specify the dimension of the chart using
widthandheightattributes.Set the type of data (JSON/XML) you want to pass to the chart object using
dataFormatattribute.Depending on the value passed to the
dataFormatattribute, set thedataSourceattribute (JSON/XML) from where the data will be fetched.
In the JSON data
Set the attributes and their corresponding values in
"<attributeName>": "<value>"format.Specify the value for a data item using the
valueattribute within thedataobject.Specify the series name for the dataset using
seriesNameattribute.Set the
lowerBoxColorattribute to specify the hex color code to be used to render the lower quartile box. This attribute belongs to the dataset object.Set the
upperBoxColorattribute to specify the hex color code to be used to render the upper quartile box. This attribute belongs to the dataset object.Set the
valueattribute to specify a comma-separated list of values for each item in the dataset. This attribute belongs to thedataobject underdatasetobject.
Note: Comma (
,) is the default data-separator. Specify the data-separator explicitly using thedataSeparatorattribute.
For a detailed list of attributes, refer to the chart attributes page of box and whisker chart.
Refer to the code given below:
{
    "chart": {
        ...
    },
    "categories": [{
        ...
    }],
    "dataset": [{
            "seriesname": "Male",
            "lowerBoxColor": "#0075c2",
            "upperBoxColor": "#1aaf5d",
            "data": [{
                    "value": "2400,2000,2500,2800,3500,4000"
                },
            ]
        }
    ]
}
The box and whisker chart looks like:
{
    "chart": {
        "theme": "fusion",
        "caption": "Distribution of annual salaries",
        "subcaption": "By Gender",
        "xAxisName": "Pay Grades",
        "YAxisName": "Salaries (In USD)",
        "numberPrefix": "$",
        "legendBorderAlpha": "0",
        "legendShadow": "0",
        "legendPosition": "right",
        "showValues": "0",
        "toolTipColor": "#ffffff",
        "toolTipBorderThickness": "0",
        "toolTipBgColor": "#000000",
        "toolTipBgAlpha": "80",
        "toolTipBorderRadius": "2",
        "toolTipPadding": "5"
    },
    "categories": [
        {
            "category": [
                {
                    "label": "Grade 1"
                },
                {
                    "label": "Grade 2"
                },
                {
                    "label": "Grade 3"
                }
            ]
        }
    ],
    "dataset": [
        {
            "seriesname": "Male",
            "lowerBoxColor": "#0075c2",
            "upperBoxColor": "#1aaf5d",
            "data": [
                {
                    "value": "2400,2000,2500,2800,3500,4000, 3700, 3750, 3880, 5000,5500,7500,8000,8200, 8400, 8500, 8550, 8800, 8700, 9000, 14000"
                },
                {
                    "value": "7500,9000,12000,13000,14000,16500,17000, 18000, 19000, 19500"
                },
                {
                    "value": "15000,19000,25000,32000,50000,65000"
                }
            ]
        },
        {
            "seriesname": "Female",
            "lowerBoxColor": "#f45b00",
            "upperBoxColor": "#f2c500",
            "data": [
                {
                    "value": "1900,2100,2300,2350,2400,2550,3000,3500,4000, 6000, 6500, 9000"
                },
                {
                    "value": "7000,8000,8300,8700,9500,11000,15000, 17000, 21000"
                },
                {
                    "value": "24000,32000,35000,37000,39000, 58000"
                }
            ]
        }
    ]
}<html>
<head>
<title>My first chart using FusionCharts Suite XT</title>
<script type="text/javascript" src="https://cdn.fusioncharts.com/fusioncharts/latest/fusioncharts.js"></script>
<script type="text/javascript" src="https://cdn.fusioncharts.com/fusioncharts/latest/themes/fusioncharts.theme.fusion.js"></script>
<script type="text/javascript">
FusionCharts.ready(function(){
var fusioncharts = new FusionCharts({
type: 'boxandwhisker2d',
renderAt: 'chart-container',
width: '550',
height: '350',
dataFormat: 'json',
dataSource: {
"chart": {
"theme": "fusion",
"caption": "Distribution of annual salaries",
"subcaption": "By Gender",
"xAxisName": "Pay Grades",
"YAxisName": "Salaries (In USD)",
"numberPrefix": "$",
"legendBorderAlpha": "0",
"legendShadow": "0",
"legendPosition": "right",
"showValues": "0",
"toolTipColor": "#ffffff",
"toolTipBorderThickness": "0",
"toolTipBgColor": "#000000",
"toolTipBgAlpha": "80",
"toolTipBorderRadius": "2",
"toolTipPadding": "5"
},
"categories": [{
"category": [{
"label": "Grade 1"
}, {
"label": "Grade 2"
}, {
"label": "Grade 3"
}]
}],
"dataset": [{
"seriesname": "Male",
"lowerBoxColor": "#0075c2",
"upperBoxColor": "#1aaf5d",
"data": [{
"value": "2400,2000,2500,2800,3500,4000, 3700, 3750, 3880, 5000,5500,7500,8000,8200, 8400, 8500, 8550, 8800, 8700, 9000, 14000"
}, {
"value": "7500,9000,12000,13000,14000,16500,17000, 18000, 19000, 19500"
}, {
"value": "15000,19000,25000,32000,50000,65000"
}]
}, {
"seriesname": "Female",
"lowerBoxColor": "#f45b00",
"upperBoxColor": "#f2c500",
"data": [{
"value": "1900,2100,2300,2350,2400,2550,3000,3500,4000, 6000, 6500, 9000"
}, {
"value": "7000,8000,8300,8700,9500,11000,15000, 17000, 21000"
}, {
"value": "24000,32000,35000,37000,39000, 58000"
}]
}]
}
}
);
fusioncharts.render();
});
</script>
</head>
<body>
<div id="chart-container">FusionCharts XT will load here!</div>
</body>
</html>Click here to edit the box and whisker chart.
Add Legends to the chart
FusionCharts Suite XT supports legend for the box and whisker chart. Legend allows you to display single color icons for numeric numbers.
To display the legend in a box and whisker chart, the following attributes are used:
To display the legend on your chart, set the
showLegendattribute to1.Specify the position of legend on the chart using
legendPositionattribute. Set the value of this attribute tobottomto display the legend below the chart, whereas setting the value torightto display the legend at the right side of the chart.
For the detailed list of attributes to configure legend, refer to the API reference page of the box and whisker chart.
Refer to the code given below:
{
    "chart": {
        "showLegend": "1",
        "legendPosition": "right"
    }

}
A simple box and whisker chart rendered with a legend looks like this:
Click here to edit the above chart.
Configure the Five Summary Numbers
Let's customize the five summary numbers and their deviations plotted on a box and a whisker chart.
Show/Hide the numbers
A box and whisker chart with three of the five summary numbers - the minimum and maximum numbers and the median - shown. To set the display of the summary numbers, follow the points given below:
Set the
showValuesattribute to display the five number summary on the chart. The default value of this attribute is1which shows the values in the chart, whereas setting it to0will hide the values.To hide the minimum value (or the lower limit) of each data plot, set the
showMinValuesattribute to0. The default value for this attribute is1.To hide the maximum value (or the upper limit) of each data plot, set the
showMaxValuesattribute to0. The default value for this attribute is1.To hide the median values in the chart, set the
showMedianValuesattribute to0. The default value for this attribute is1.To hide the lower quartile value of each data plot, set the
showQ1Valuesattribute to0. The default value for this attribute is1.To hide the upper quartile value of each data plot, set the
showQ3Valuesattribute to0. The default value for this attribute is1.
All the attributes listed above works when
showValuesattribute is set to1.
Refer to the code below:
{
    "chart": {
        "showvalues": "1",
        "showMinValues": "1",
        "showMaxValues": "1",
        "showMedianValues": "1",
        "showQ1Values": "0",
        "showQ3Values": "0"
    }
}A box and whisker chart with five summary numbers- the minimum and maximum numbers and the median shown looks like:
Click here to edit the above chart.
To selectively show summary numbers on the chart, firstly set the showValues attribute to 1. Now set the attributes to show the respective values for summary numbers as shown below:
Set the value of
showQ1Valuesto1to show the value of Q1.Set the value of
showQ3Valuesto1to show the value of Q3.Set the value of
showMedianValuesto1to show the value of the median.Set the value of
showMinValuesto1to show the min value.Set the value of
showMaxValuesto1to show the max value.
Refer to the code given below:
{
    "chart": {
        "showQ1Values": "0",
        "showQ3Values": "0",
        "showMedianValues": "0",
        "showMinValues": "1",
        "showMaxValues": "1"
    }
}You can also configure the box and whisker chart to show all five summary numbers at once.
Refer to the code given below:
{
    "chart": {
        "showQ1values": "1",
        "showQ3values": "1",
        "showMedianValues": "1",
        "showMinValues": "1",
        "showMaxValues": "1"
    }
}Customize the Median (Q2)
The median for a set of numbers is represented by a line at the center of the box plot. The median acts as the separator between the upper and lower quartile boxes.
To customize the median, follow the steps given below:
Set the
medianColorattribute to specify the hex color code for the median line.Set the
medianThicknessattribute to specify the thickness of the median line.Set the
medianAplhaattribute to specify the transparency of the median line. This attribute takes values between0(transparent) and100(opaque).
All these attributes can be used with the chart, dataset, and the data objects depending on the requirement.
Refer to the code below:
{
    "chart": {
        "medianColor": "ff0000",
        "medianThickness": "5",
        "medianAplha": "70"
    }
}
The chart will look like as shown below:
Click here to edit the above chart.
Customize the Upper and Lower Quartiles (Q1 and Q3)
The quartiles of a set of data are spread as two boxes, separated by the median. The roof of the upper quartile box represents the exact value of the upper quartile (Q3). The base of the lower quartile box represents the exact value of the lower quartile (Q1).
To customize the upper and the lower quartile points and the boxes, follow the points given below:
Set the
upperQuartileColorattribute to specify the hex color code for the exact value of upper quartile. the line is the roof of the upper quartile box.Set the
upperQuartileThicknessattribute to specify the thickness of the upper quartile line.Set the
upperQuartileAlphaattribute to specify the transparency of the upper quartile line. This attribute takes values between0(transparent) and100(opaque).
{
    "chart": {
        //The color of the upper quartile set to Red
        "upperQuartileColor": "ff0000",

        //The thickness of the upper quartile set to 5
        "upperQuartileThickness": "5",

        //The transparency of the upper quartile set to 70
        "upperQuartileAlpha": "70"
    }
}
Set the
upperBoxColorattribute to specify the hex color code of the upper quartile box.Set the
upperBoxAlphaattribute to specify the transparency of the upper quartile box. This attribute takes values between0(transparent) and100(opaque).
{
    "chart": {
        "upperBoxColor": "ff0000",
        "upperBoxAlpha": "70"
    }
}
Set the
upperBoxBorderColorattribute to specify the hex color code for the two sides of upper quartile box.Set the
upperBoxBorderAlphaattribute to specify the transparency for the two sides of upper quartile box. This attribute takes values between0(transparent) and100(opaque).Set the
upperBoxBorderThicknessattribute to specify the thickness for the two sides of upper quartile box.
{
    "chart": {
        "upperBoxBorderColor": "ff0000",
        "upperBoxBorderAlpha": "70",
        "upperBoxBorderThickness": "5"
    }
}
Set the
lowerQuartileColorattribute to specify the hex color code for the exact value of lower quartile. The line is the roof of the lower quartile box.Set the
lowerQuartileThicknessattribute to specify the thickness of the lower quartile line.Set the
lowerQuartileAlphaattribute to specify the transparency of the lower quartile line. This attribute takes values between0(transparent) and100(opaque).
{
    "chart": {
        "lowerQuartileColor": "ff0000",
        "lowerQuartileThickness": "5",
        "lowerQuartileAlpha": "70"
    }
}Set the
lowerBoxColorattribute to specify the hex color code of the lower quartile box.Set the
lowerBoxAlphaattribute to specify the transparency of the lower quartile box. This attribute takes values between0(transparent) and100(opaque).Set the
lowerBoxBorderColorattribute to specify the hex color code for the two sides of lower quartile box.Set the
lowerBoxBorderAlphaattribute to specify the transparency for the two sides of lower quartile box. This attribute takes values between0(transparent) and100(opaque).Set the
lowerBoxBorderThicknessattribute to specify the thickness for the two sides of lower quartile box.
Refer to the code below:
{
    "chart": {
        "lowerBoxColor": "ff0000",
        "lowerBoxAlpha": "70",
        "lowerBoxBorderColor": "ff0000",
        "lowerBoxBorderAlpha": "70",
        "lowerBoxBorderThickness": "5"
    }
}The chart will look like as shown below:
Click here to edit the above chart.
Customize the Lower and Upper Whiskers
The box and whisker chart displays the biggest number of a set of values as the upper whisker and the smallest number of the set as the lower whisker.
To customize the whiskers, follow the points given below:
Set the
upperWhiskerColorattribute to specify the hex color code for the upper whisker of the data plot.Set the
upperWhiskerThicknessattribute to specify the thickness of the upper whisker.Set the
upperWhiskerAlphaattribute to specify the transparency of the upper whisker. This attribute takes values between0(transparent) and100(opaque).Set the
lowerWhiskerColorattribute to specify the hex color code for the lower whisker of the data plot.Set the
lowerWhiskerThicknessattribute to specify the thickness of the lower whisker.Set the
lowerWhiskerAlphaattribute to specify the transparency of the lower whisker. This attribute takes values between0(transparent) and100(opaque).Set the
whiskersLimitsWidthRatioattribute to specify the width of the whiskers (in percentage) with respect to the width of the box plot.
Refer to the code below:
{
    "chart": {
        "upperWhiskerColor": "ff0000",
        "upperWhiskerThickness": "5",
        "upperWhiskerAlpha": "70",
        "lowerWhiskerColor": "0fff00",
        "lowerWhiskerThickness": "5",
        "lowerWhiskerAlpha": "70",
        "whiskersLimitsWidthRatio": "3"
    }
}The chart will look like as shown below:
Click here to edit the above chart.
Configure Mean
Mean is the mathematical average for a set of numbers.
In a box and whisker chart, along with the dataset series name, the legend also shows the icons for mean, mean deviation, standard deviation, quartile deviation, and the outliers of every data plot. This is a concept exclusively applicable to the box and whisker chart. Each dataset is highlighted by different colors to differentiate between them and their icons easily. The legend icons are interactive; you can click the icons to show/hide the associated values on the chart.
Let's customize the mean in box and whisker chart.
Show/Hide the Mean Icon
To show the mean deviation icon in the legend set the showMean attribute to 1. This attribute will specify whether the icon representing the mean of the dataset will be shown in the legend. The default value of this attribute is 0 which hides the icon.
The above attribute can be used with the chart, dataset and data objects.
Refer to the code given below:
{
    "chart": {
        "showMean": "1"
    }
}A box and whisker chart with the mean icon shown in the legend looks like this:
Click here to edit the above chart.
Customize the Mean Icon
To customize the mean icon in the box and whisker chart, follow the points given below:
Set the
meanIconRadiusattribute to specify the radius of the mean icon.Set the
meanIconSidesattribute to specify the sides of the mean icon.Set the
meanIconShapeattribute to specify the shape of the mean icon. This attribute takes one of the following two values:polygonorspoke. The default shape for the mean icon is the triangle (i.e., a polygon with three sides).Set the
meanIconColorattribute to specify the hex color code of the mean icon.Set the
meanIconAlphaattribute to set the transparency of the mean icon. This attribute takes values between0(transparent) and100(opaque).
Refer to the code below:
{
    "chart": {
        "meanIconRadius": "5",
        "meanIconSides": "3",
        "meanIconShape": "triangle",
        "meanIconColor": "ff0000,
        "meanIconAlpha": "70"
    }
}The chart will look like as shown below:
Click here to edit the above chart.
Draw Mean Connectors
For multiple data plots, you can draw a line to connect the mean values of each data plot. To draw the mean connectors, set the value of drawMeanConnector attribute as 1. It specifies whether a connector should be drawn to connect the mean for multiple sets of data. The default value of this attribute is 0.
The color that is used to render the mean deviation icon is also used to render the connecting line.
Refer to the code given below:
{
    "chart": {
        "drawMeanConnector": "1"
    }
}A box and whisker chart rendered with mean connectors looks like this:
Click here to edit the above chart.
Connect Null Data
If you use the showMean attribute with the data object and set it to 0, the chart will not display the mean icon for that particular set of data. In this case, the missing mean deviation is considered as null data. Consequently, the mean connectors will skip this null data and draw a continuous connector.
In the chart shown below, a connector is drawn connecting the mean deviation icons of the first and the third data plots, skipping the second data plot. Set the value of connectNullData attribute as 1 to connect the null data using mean connectors. This will ignore the null values and draw a continuous connector line. This attribute is applicable for the mean icon and all the other deviation icons.
Refer to the code given below:
{
    "chart": {
        "connectNullData": "1"
    }
}A box and whisker chart with null data connected using mean connectors is given below:
Click here to edit the above chart.
Click here to edit the above chart.
Configure Mean Deviation
Mean deviation is the average of distances between each of the values and the mean. It gives us an idea of how spread out is the set of values from the center.
In a box and whisker chart, along with the dataset series name, the legend also shows the icons for mean, mean deviation, standard deviation, quartile deviation, and the outliers of every data plot. This is a concept exclusively applicable to the box and whisker chart. Each dataset is highlighted by different colors to differentiate between them and their icons easily. The legend icons are interactive; you can click the icons to show/hide the associated values on the chart.
Let's move ahead and customize the mean deviation of box and whisker chart.
Show/Hide the Mean Deviation Icon
A box and whisker chart with the mean deviation icon can be shown in the legend box using showMD attribute. This attribute when set to 1, will show the icon representing the mean deviation value of the dataset in the legend.
Refer to the code given below:
{
    "chart": {
        "showMD": "1"
    }
}The box and whisker chart with mean deviation icon shown in the legend box looks like:
Click here to edit the above chart.
Customize the Mean Deviation Icon
To customize the mean deviation icon, follow the points given below:
Set the
mdIconRadiusattribute to specify the radius of the mean deviation icon.Set the
mdIconSidesattribute to specify the sides of the mean deviation icon.Set the
mdIconShapeattribute to specify the shape of the mean deviation icon. This attribute takes one of the following two values:polygonorspoke. The default shape for the mean deviation icon is the triangle (i.e., a polygon with three sides).Set the
mdIconColorattribute to specify the hex color code of the mean deviation icon.Set the
mdIconAlphaattribute to set the transparency of the mean deviation icon. This attribute takes values between0(transparent) and100(opaque).
Refer to the code below:
{
    "chart": {
        "mdIconRadius": "5"
        "mdIconSides": "5"
        //"mdIconShape": "triangle"
        "mdIconColor": "ff0000"
        "mdIconAlpha": "70"
    }
}The chart will look like as shown below:
Click here to edit the above chart.
Draw Mean Deviation Connectors
For multiple data plots, you can draw a line to connect the mean deviation icons of each data plot. To draw the mean connectors, set the value of drawMDConnector attribute as 1. It specifies whether a connector should be drawn to connect the mean deviation for multiple sets of data. The default value of this attribute is 0.
The color that is used to render the mean deviation icon is also used to render the connecting line.
Refer to the code given below:
{
    "chart": {
        "drawMDConnector": "1"
    }
}A box and whisker chart rendered with a mean deviation connector looks like this:
Click here to edit the above chart.
Connect Null Data
If you use the showMD attribute with the data object and set it to 0, the chart will not display the mean deviation icon for that particular set of data. In this case, the missing mean deviation is considered as null data. Consequently, the mean deviation connectors will skip this null data and draw a continuous connector.
In the chart shown below, a connector is drawn connecting the mean deviation icons of the first and the third data plots, skipping the second data plot. Set the value of connectNullData attribute as 1 to connect the null data using mean connectors. This will ignore the null values and draw a continuous connector line. This attribute is applicable for the mean icon and all the other deviation icons.
Refer to the code given below:
{
    "chart": {
        "connectNullData": "1"
    }
}Configure Standard Deviation
Standard deviation is the measure of the variation or the dispersion of a set of data from the mean. It gives an idea of how spread out is the set of data from the mean.
In a box and whisker chart, along with the dataset series name, the legend also shows the icons for mean, mean deviation, standard deviation, quartile deviation, and the outliers of every data plot. This is a concept exclusively applicable to the box and whisker chart. Each dataset is highlighted by different colors to differentiate between them and their icons easily. The legend icons are interactive; you can click the icons to show/hide the associated values on the chart.
Let's move ahead and customize the standard deviation of box and whisker chart.
Show/Hide the Standard Deviation Icon
A box and whisker chart with the standard deviation icon can be shown in the legend box using showSD attribute. This attribute when set to 1, will show the icon representing the standard deviation value of the dataset in the legend.
Refer to the code given below:
{
    "chart": {
        "showSD": "1"
    }
}A box and whisker chart with the standard deviation icon shown in the legend box looks like this:
Click here to edit the above chart.
To show/hide individual standard deviation values, use the
showSDattribute with thedataobject, whhich belongs to thedatasetobject.
Customize the Standard Deviation Icon
To customize the standard deviation icon, follow the points given below:
Set the
sdIconRadiusattribute to specify the radius of the standard deviation icon.Set the
sdIconSidesattribute to specify the sides of the standard deviation icon.Set the
sdIconShapeattribute to specify the shape of the standard deviation icon. This attribute takes one of the following two values:polygonorspoke. The default shape for the standard deviation icon is the triangle (i.e., a polygon with three sides).Set the
sdIconColorattribute to specify the hex color code of the standard deviation icon.Set the
sdIconAlphaattribute to set the transparency of the standard deviation icon. This attribute takes values between0(transparent) and100(opaque).
Refer to the code given below:
{
    "chart": {
        "sdIconRadius": "5",
        "sdIconSides": "5",
        "sdIconShape": "triangle",
        "sdIconColor": "ff0000",
        "sdIconAlpha": "70"
    }
}A box and whisker chart with the standard deviation icon shown in the legend box looks like this:
Click here to edit the above chart.
Draw Standard Deviation Connectors
For multiple data plots, you can draw a line to connect the standard deviation icons of each data plot. To draw the connectors, set the value of drawSDConnector attribute as 1. It specifies whether a connector should be drawn to connect the standard deviation for multiple sets of data. The default value of this attribute is 0.
The color that is used to render the standard deviation icon is also used to render the connecting line.
Refer to the code given below:
{
    "chart": {
        "drawSDConnector": "1"
    }
}A box and whisker chart rendered with a standard deviation connector looks like this:
Click here to edit the above chart.
Connect Null data
If you use the showSD attribute with the data object and set it to 0, the chart will not display the standard deviation icon for that particular set of data. In this case, the missing standard deviation is considered as null data. Consequently, the standard deviation connectors will skip this null data and draw a continuous connector.
In the chart shown below, a connector is drawn connecting the standard deviation icons of the first and the third data plots, skipping the second data plot. Set the value of connectNullData attribute as 1 to connect the null data using standard deviation connectors. This will ignore the null values and draw a continuous connector line. This attribute is applicable for the standard deviation icon and all the other deviation icons.
Refer to the code given below:
{
    "chart": {
        "connectNullData": "1"
    }
}Configuring Quartile Deviation
The distance between the upper quartile and the lower quartile is called the interquartile range. Quartile deviation is half the distance between the two quartiles, i.e., half the interquartile range. It is also called the semi-interquartile range.
In a box and whisker chart, along with the dataset series name, the legend also shows the icons for mean, mean deviation, standard deviation, quartile deviation, and the outliers of every data plot. This is a concept exclusively applicable to the box and whisker chart. Each dataset is highlighted by different colors to differentiate between them and their icons easily. The legend icons are interactive; you can click the icons to show/hide the associated values on the chart.
Let's move on to customize the quartile deviation of box and whisker chart.
Show/Hide the Quartile Deviation Icon
A box and whisker chart with the quartile deviation icon can be shown in the legend box using showQD attribute. This attribute when set to 1, will show the icon representing the quartile deviation value of the dataset in the legend.
Refer to the code given below:
{
    "chart": {
        "showQD": "1"
    }
}A box and whisker chart with the quartile deviation icon shown in the legend box looks like this:
Click here to edit the above chart.
To show/hide individual quartile deviation values, use the
showSDattribute with thedataobject, which belongs to thedatasetobject.
Customize the Quartile Deviation Icon
To customize the quartile deviation icon, follow the points given below:
Set the
qdIconRadiusattribute to specify the radius of the quartile deviation icon.Set the
qdIconSidesattribute to specify the sides of the quartile deviation icon.Set the
qdIconShapeattribute to specify the shape of the quartile deviation icon. This attribute takes one of the following two values:polygonorspoke. The default shape for the quartile deviation icon is the triangle (i.e., a polygon with three sides).Set the
qdIconColorattribute to specify the hex color code of the quartile deviation icon.Set the
qdIconAlphaattribute to set the transparency of the quartile deviation icon. This attribute takes values between0(transparent) and100(opaque).
Refer to the code below:
{
    "chart": {
        "qdIconRadius": "5",
        "qdIconSides": "5",
        "qdIconShape": "triangle",
        "qdIconColor": "ff0000",
        "qdIconAlpha": "70"
    }
}
The chart will look like as shown below:
Click here to edit the above chart.
Draw Quartile Deviation Connectors
For multiple data plots, you can draw a line to connect the quartile deviation icons of each data plot. To draw the connectors, set the value of drawQDConnector attribute as 1. It specifies whether a connector should be drawn to connect the quartile deviation for multiple sets of data. The default value of this attribute is 0.
The color that is used to render the quartile deviation icon is also used to render the connecting line.
Refer to the code given below:
{
    "chart": {
        "drawQDConnector": "1"
    }
}
A box and whisker chart rendered with a quartile deviation connector looks like this:
Click here to edit the above chart.
Connect Null data
If you use the showQD attribute with the data object and set it to 0, the chart will not display the quartile deviation icon for that particular set of data. In this case, the missing quartile deviation is considered as null data. Consequently, the quartile deviation connectors will skip this null data and draw a continuous connector.
In the chart shown below, a connector is drawn connecting the quartile deviation icons of the first and the third data plots, skipping the second data plot. Set the value of connectNullData attribute as 1 to connect the null data using quartile deviation connectors. This will ignore the null values and draw a continuous connector line. This attribute is applicable for the quartile deviation icon and all the other deviation icons.
Refer to the code given below:
{
    "chart": {
        "connectNullData": "1"
    }
}
A box and whisker chart with the quartile deviation null data connected looks like this:
Configuring Outliers
Outliers are values that are numerically distant from the set of numbers provided. They are indicative values which may occur by chance or by error for any set of data provided. Outliers are not included in the statistical calculation of the five summary numbers - the minimum and maximum values, the median value, and the lower and upper quartile values. Instead, they are placed as separate points on the chart.
Customize the Outlier Icon
To show the customization of the outlier icon, let's create a chart where the outlier values will be displayed as triangle icons above each data plot.
To customize the outlier icon, follow the points given below:
Set the
outliersattribute to specify the outliers or the values greater than the maximum value from the data set provided.Set the
outlierIconRadiusattribute to specify the radius of the outlier icon.Set the
outlierIconSidesattribute to specify the sides of the outlier icon.Set the
outlierIconShapeattribute to specify the shape of the outlier icon. This attribute takes one of the following two values:polygonorspoke. The default shape for the outlier icon is the triangle (i.e., a polygon with three sides).Set the
outlierIconColorattribute to specify the hex color code of the outlier icon.Set the
outlierIconAlphaattribute to set the transparency of the outlier icon. This attribute takes values between0(transparent) and100(opaque).
All the attributes listed above belong to the
dataobject (underdatasetobject).
Refer to the code below:
{
    "chart": {
        ...
    },
    "data": {
        "outliers": "1"
        "outlierIconRadius": "5",
        "outlierIconSides": "5",
        "outlierIconShape": "triangle",
        "outlierIconColor": "ff0000",
        "outlierIconAlpha": "70"
    }
}A box and whisker chart with outliers looks like this:
Click here to edit the above chart.
Show Outliers beyond the Range
For the chart shown above, all outliers provided as values to the outliers attribute are in the range of the y-axis scale. However, there can be instances where the outlier values lie outside the range of the y-axis. In this case, by default, such outlier values are not shown on the chart to maintain the visual integrity of the data plots.
To show all outliers on the box and whisker chart, set the value of showAllOutliers attribute to 1. This will show the outlier values beyond the range of the y-axis. The default value of this attribute is 0, i.e., hidden outliers.
A box and whisker chart with outliers beyond the range of the y-axis hidden looks like this:
Click here to edit the above chart.
In the data above, you will see that the outlier values for Grade 3 are 72000 for male and 71000 for female. Therefore, the outliers for these values are not shown on the chart.
You can opt to show these hidden outlier values.
A box and whisker chart with outlier values shown on the chart looks like this:
Click here to edit the above chart.