Export a Dashboard
FusionExport allows you to export dashboards containing multiple charts. In this tutorial you will learn how to export a dashboard using FusionExport.
Prerequisites
Before starting with the code, ensure that you have:
Downloaded and installed FusionExport Server , and the server is running
Steps to Create a Dashboard
The major steps are discussed below:
Create the ingredients for a basic dashboard:
- Create a dashboard template , which is an HTML file.
- Create a chart configuration file (JSON) which shall contain configuration of multiple charts.
Write the export code in one of the languages for which FusionExport has SDKs . The export code takes care of embedding the charts into the template before exporting the dashboard.
(Optional, but recommended) Add some styling (inline CSS, or a seperate CSS file) for the HTML template.
In the following sections, you will learn about the implementing the steps discussed above.
Dashboard Template and Chart Configuration
A dashboard is basically a web page consisting of two components:
A template, which forms the structure of the dashboard and is fairly static
Charts, which are dynamic in the sense that they change based on the data associated with them
Using the above principle, you can export a dashboard using FusionExport - all you need is two files (apart from the obvious export code, which depends on the SDK/language you prefer):
A template for the dashboard, which is nothing but an HTML file containing the structure of the dashboard. The most import aspect of this
.htmlfile is thedivelements, which acts as containers where the charts will be eventually rendered. The value of theidelement for thesedivattributes is used by FusionExport to correctly map the charts with their respectivediv.A chart configuration file, which is a JSON file containing configuration for the charts that need to be rendered. Each of these chart configurations has a
renderAtattribute, the value for which must be the exact same string as the value of theidattribute for its correspondingdivin the HTML template.
Sample Template
For this tutorial, we will use an extremely simple .html template, which has the provision to render three charts.
<!DOCTYPE html>
<html>
    <head>
        <meta charset="utf-8">
        <title>FusionExport Dashboard</title>
    </head>
    <body>
        <div id="column_chart">
            <!-- COLUMN 2D CHART RENDERED HERE -->
        </div>
        <div id="pie_chart">
            <!-- PIE CHART RENDERED HERE -->
        </div>
        <div id="line_chart">
            <!-- LINE CHART RENDERED HERE -->
        </div>
    </body>
</html>If you execute the export code without any modification, the HTML template must be in the path:
<export_code_runs_from_this_directory>/resources/dashboard-template.htmlSample Configuration
In a JSON file containing the configuration of multiple charts:
- The JSON must consist of an array of objects
- Each object contains configurations for individual charts
Given below is a schematic representation of a JSON file containing configurations of three charts.
[
    {
        // chart 1 configuration
    },
    {
        // chart 2 configuration
    },
    {
        // chart 3 configuration
    }
]For this tutorial, we will a .json the configuration file for three charts:
If you are executing the template code without any changes, the chart configuration file should be in the following path:
<code_executed_from_this_directory>/resources/chart-config-file.jsonThe accepted format of configuration is the same as that of charts you can generate using FusionCharts Suite . Refer to Chart Attributes for detailed information on the possible configurations of the charts.
Observe the use of the
renderAtattribute for each of the chart configurations. The value ofrenderAtmust be the exact same string as the value of theidattribute, for its correspondingdivin the HTML template.
[{
    "type": "column2d",
    "renderAt": "column_chart",
    "width": "550",
    "height": "350",
    "dataFormat": "json",
    "dataSource": {
        "chart": {
            "caption": "Number of visitors in the last 3 days",
            "subCaption": "Bakersfield Central vs Los Angeles Topanga",
            "theme": "fusion"
        },
        "data": [{
            "label": "Mon",
            "value": "15123"
        }, {
            "label": "Tue",
            "value": "14233"
        }, {
            "label": "Wed",
            "value": "25507"
        }]
    }
}, {
    "type": "pie2d",
    "renderAt": "pie_chart",
    "width": "550",
    "height": "350",
    "dataFormat": "json",
    "dataSource": {
        "chart": {
            "caption": "Split of revenue by product categories",
            "subCaption": "Last year",
            "numberPrefix": "$",
            "showPercentInTooltip": "0",
            "decimals": "1",
            "useDataPlotColorForLabels": "1",
            "theme": "fusion"
        },
        "data": [{
            "label": "Food",
            "value": "285040"
        }, {
            "label": "Apparels",
            "value": "146330"
        }, {
            "label": "Electronics",
            "value": "105070"
        }, {
            "label": "Household",
            "value": "49100"
        }]
    }
}, {
    "type": "line",
    "renderAt": "line_chart",
    "width": "550",
    "height": "350",
    "dataFormat": "json",
    "dataSource": {
        "chart": {
            "theme": "fusion",
            "caption": "Total footfall in Bakersfield Central",
            "subCaption": "Last week",
            "xAxisName": "Day",
            "yAxisName": "No. of Visitors",
            "lineThickness": "2"
        },
        "data": [{
            "label": "Mon",
            "value": "15123"
        }, {
            "label": "Tue",
            "value": "14233"
        }, {
            "label": "Wed",
            "value": "23507"
        }, {
            "label": "Thu",
            "value": "9110"
        }, {
            "label": "Fri",
            "value": "15529"
        }, {
            "label": "Sat",
            "value": "20803"
        }, {
            "label": "Sun",
            "value": "19202"
        }],
        "trendlines": [{
            "line": [{
                "startvalue": "18500",
                "color": "#29C3BE",
                "displayvalue": "Average{br}weekly{br}footfall",
                "valueOnRight": "1",
                "thickness": "2"
            }]
        }]
    }
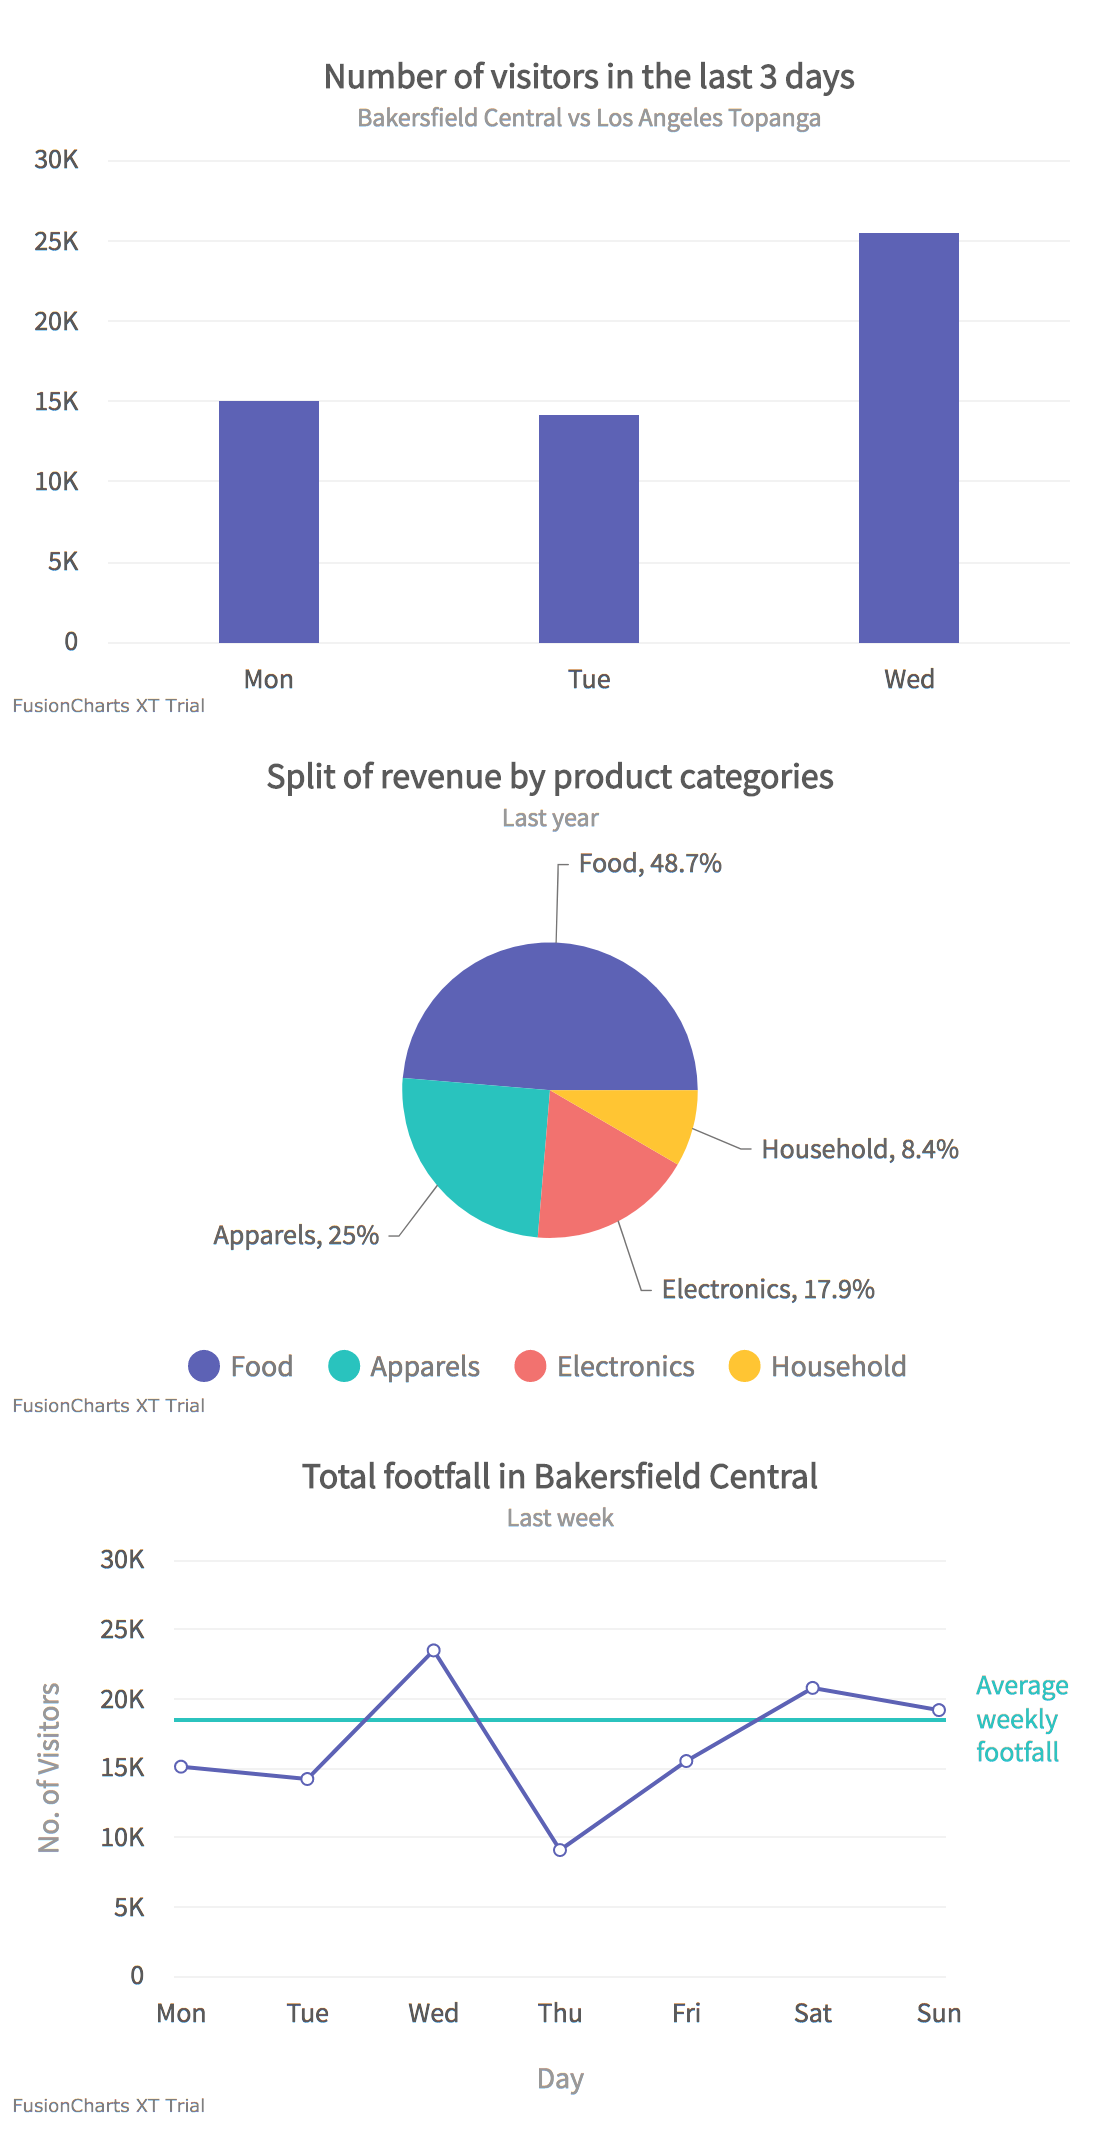
}]Based on the above configuration, the following charts will be embedded into the dashboard:

Code
Before you start with the code, we suggest going through the steps that the code accomplishes.
Import and resolve the dependencies as per the system/programming language specific dependencies, and the FusionExport SDK client.
Create a new instance of the
ExportConfig()object, which will be used to extract the chart configuration by using the chart configuration file path you pass to itsset()method. You can also pass on an object containing the serialized JSON string representation of the configuration to theset()method. Use thetemplateFilePathparameter of theset()method to pass the path of the dashboard template file.Create a new instance of the
ExportManager()object. To export the chart, pass the instance ofExportConfig()toexport(), which is a method of the instance ofExportManager(). This will export the dashboard, and save the output file to the path you provide as the value of theoutputDirparameter (by default, it is the directory from which the code is being executed).Use the instance of
ExportManager()to perform pass success messages using theon()method, and save the exported chart in an appropriate file format using thesaveExportedFiles()method.
Exported Dashboard
Based on the template, chart configurations, and the code mentioned above, the exported dashboard looks like the image below.

The bare bones dashboard is not suitable for business usage. We strongly recommend adding CSS to the HTML template, so that the dashboard looks presentable.
The above guidelines may vary slightly based on the programming language you are using, and the customizations you want on top of the defaults.
The exported dashboard will have the default name of
export--1.png. If you execute the template code without any changes, you can find it in the same directory from where the code has been executed.
For detailed information on the vast number of possibilities, refer to FusionExport SDK API Reference , and select the SDK of your choice from the left navigation panel.
using System;
using System.Collections.Generic;
using System.IO;
using System.Linq;
using FusionCharts.FusionExport.Client; // Import sdk

namespace FusionExportTest
{
    public static class Dashboard
    {
        public static void Run(string host = Constants.DEFAULT_HOST, int port = Constants.DEFAULT_PORT)
        {
            // Instantiate the ExportConfig class and add the required configurations
            ExportConfig exportConfig = new ExportConfig();
            List results = new List();

            // Instantiate the ExportManager class
            using (ExportManager exportManager = new ExportManager())
            {
                exportConfig.Set("chartConfig", File.ReadAllText("./resources/chart-config-file.json"));

                // ATTENTION - Pass the path of the dashboard template
                exportConfig.Set("templateFilePath", "./resources/template.html");

                // Call the Export() method with the export config
                results.AddRange(exportManager.Export(exportConfig, outputDir = ".", unzip = true));
            }

            foreach (string path in results)
            {
                Console.WriteLine(path);
            }
            Console.Read();

        }
    }
}
import com.fusioncharts.fusionexport.client.*; // import sdk

public class Script {
    public static void main(String[] args) throws Exception {
        String configPath = "resources/chart-config-file.json";

        // Instantiate the ExportConfig class and add the required configurations
        ExportConfig config = new ExportConfig();
        // Provide path of the chart configuration which we have defined above.
        // You can also pass the same object as serialized JSON.
        config.set("chartConfig", configPath);

        // ATTENTION - Pass the path of the dashboard template
        config.set("templateFilePath", "./resources/dashboard-template.html");

        // Instantiate the ExportManager class
        ExportManager manager = new ExportManager();
        // Call the export() method with the export config and the respective callbacks
        manager.export(config, outputDir = ".", unzip = true);
    }
}
<?php
    // Import dependencies
    require DIR__ . '/../vendor/autoload.php';
    use FusionExport\ExportManager;
    use FusionExport\ExportConfig;

    // Instantiate the ExportConfig class and add the required configurations
    $exportConfig = new ExportConfig();
    // Provide path of the chart configuration which we have defined above.
    // You can also pass the same object as serialized JSON.
    $exportConfig->set('chartConfig', realpath('resources/chart-config-file.json'));

    // ATTENTION - Pass the path of the dashboard template
    $exportConfig->set('templateFilePath', realpath('resources/dashboard-template.html'));

    // Instantiate the ExportManager class
    $exportManager = new ExportManager();

    // Call the export() method with the exportConfig and the respective callbacks
    $exportManager->export($exportConfig, $outputDir = '.', $unzip = true);
?>
// ** IMPORT AND RESOLVE DEPENDENCIES ***

// Import 'path' core module of Node.js
const path = require('path');

// Import FusionExport SDK client for Node.js
const {
    ExportManager,
    ExportConfig
} = require('fusionexport-node-client');


// ** EXPORT CONFIG ***

// Instantiate ExportConfig and add the required configurations
const exportConfig = new ExportConfig();


// Provide path of the chart configuration which we have defined above.
// You can also pass the same object as serialized JSON.
exportConfig.set('chartConfig', path.join(dirname, 'resources', 'chart-config-file.json'));

// ATTENTION - Pass the path of the dashboard template
exportConfig.set('templateFilePath', path.join(dirname, 'resources', 'dashboard-template.html'));


// ** EXPORT-MANAGER ***

// Instantiate ExportManager
const exportManager = new ExportManager();


// * OUTPUT **

// Provide the exportConfig
// Optionally, print the exported file names and error messages, if any

exportManager.export(exportConfig, outputDir = '.', unzip = true).then((exportedFiles) => {
    exportedFiles.forEach(file => console.log(file));
}).catch((err) => {
    console.log(err);
});
# Import sdk
from fusionexport import ExportManager, ExportConfig

# Instantiate the ExportConfig class and add the required configurations
export_config = ExportConfig()

# Provide path of the chart configuration which we have defined above.
# You can also pass the same object as serialized JSON.
export_config["chartConfig"] = read_file("resources/chart-config-file.json")

# ATTENTION - Pass the path of the dashboard template
export_config["templateFilePath"] = "resources/dashboard-template.html"

# Provide port and host of FusionExport Service
export_server_host = "127.0.0.1"
export_server_port = 1337

# Instantiate the ExportManager class
em = ExportManager(export_server_host, export_server_port)

# Call the export() method with the export_config as its argument
em.export(export_config, outputDir = ".", unzip = True)
Styling the HTML template
The bare bones template generates a dashboard which is not pretty enough for modern business usage. Therefore, we strongly recommend adding some style to the template. For minimal style, you can write some inline CSS, although it is always better to maintain a separate stylesheet file.
As shown below, you can associate a style.css file with the HTML template, and then write some CSS to make the dashboard look presentable.
Modified HTML template
<!DOCTYPE html>
<html>
    <head>
        <meta charset="utf-8">
        <title>FusionExport Dashboard</title>
        <link rel="stylesheet" href="style.css">
    </head>
    <body>
        <div class="chart" id="column_chart">
            <!-- COLUMN 2D CHART RENDERED HERE -->
        </div>
        <div class="chart" id="pie_chart">
            <!-- PIE CHART RENDERED HERE -->
        </div>
        <div class="chart" id="line_chart">
            <!-- LINE CHART RENDERED HERE -->
        </div>
    </body>
</html>style.css
.chart {
    border: 1px solid black;
    width: 98%;
    margin-left: 10px;
    margin-right: 10px;
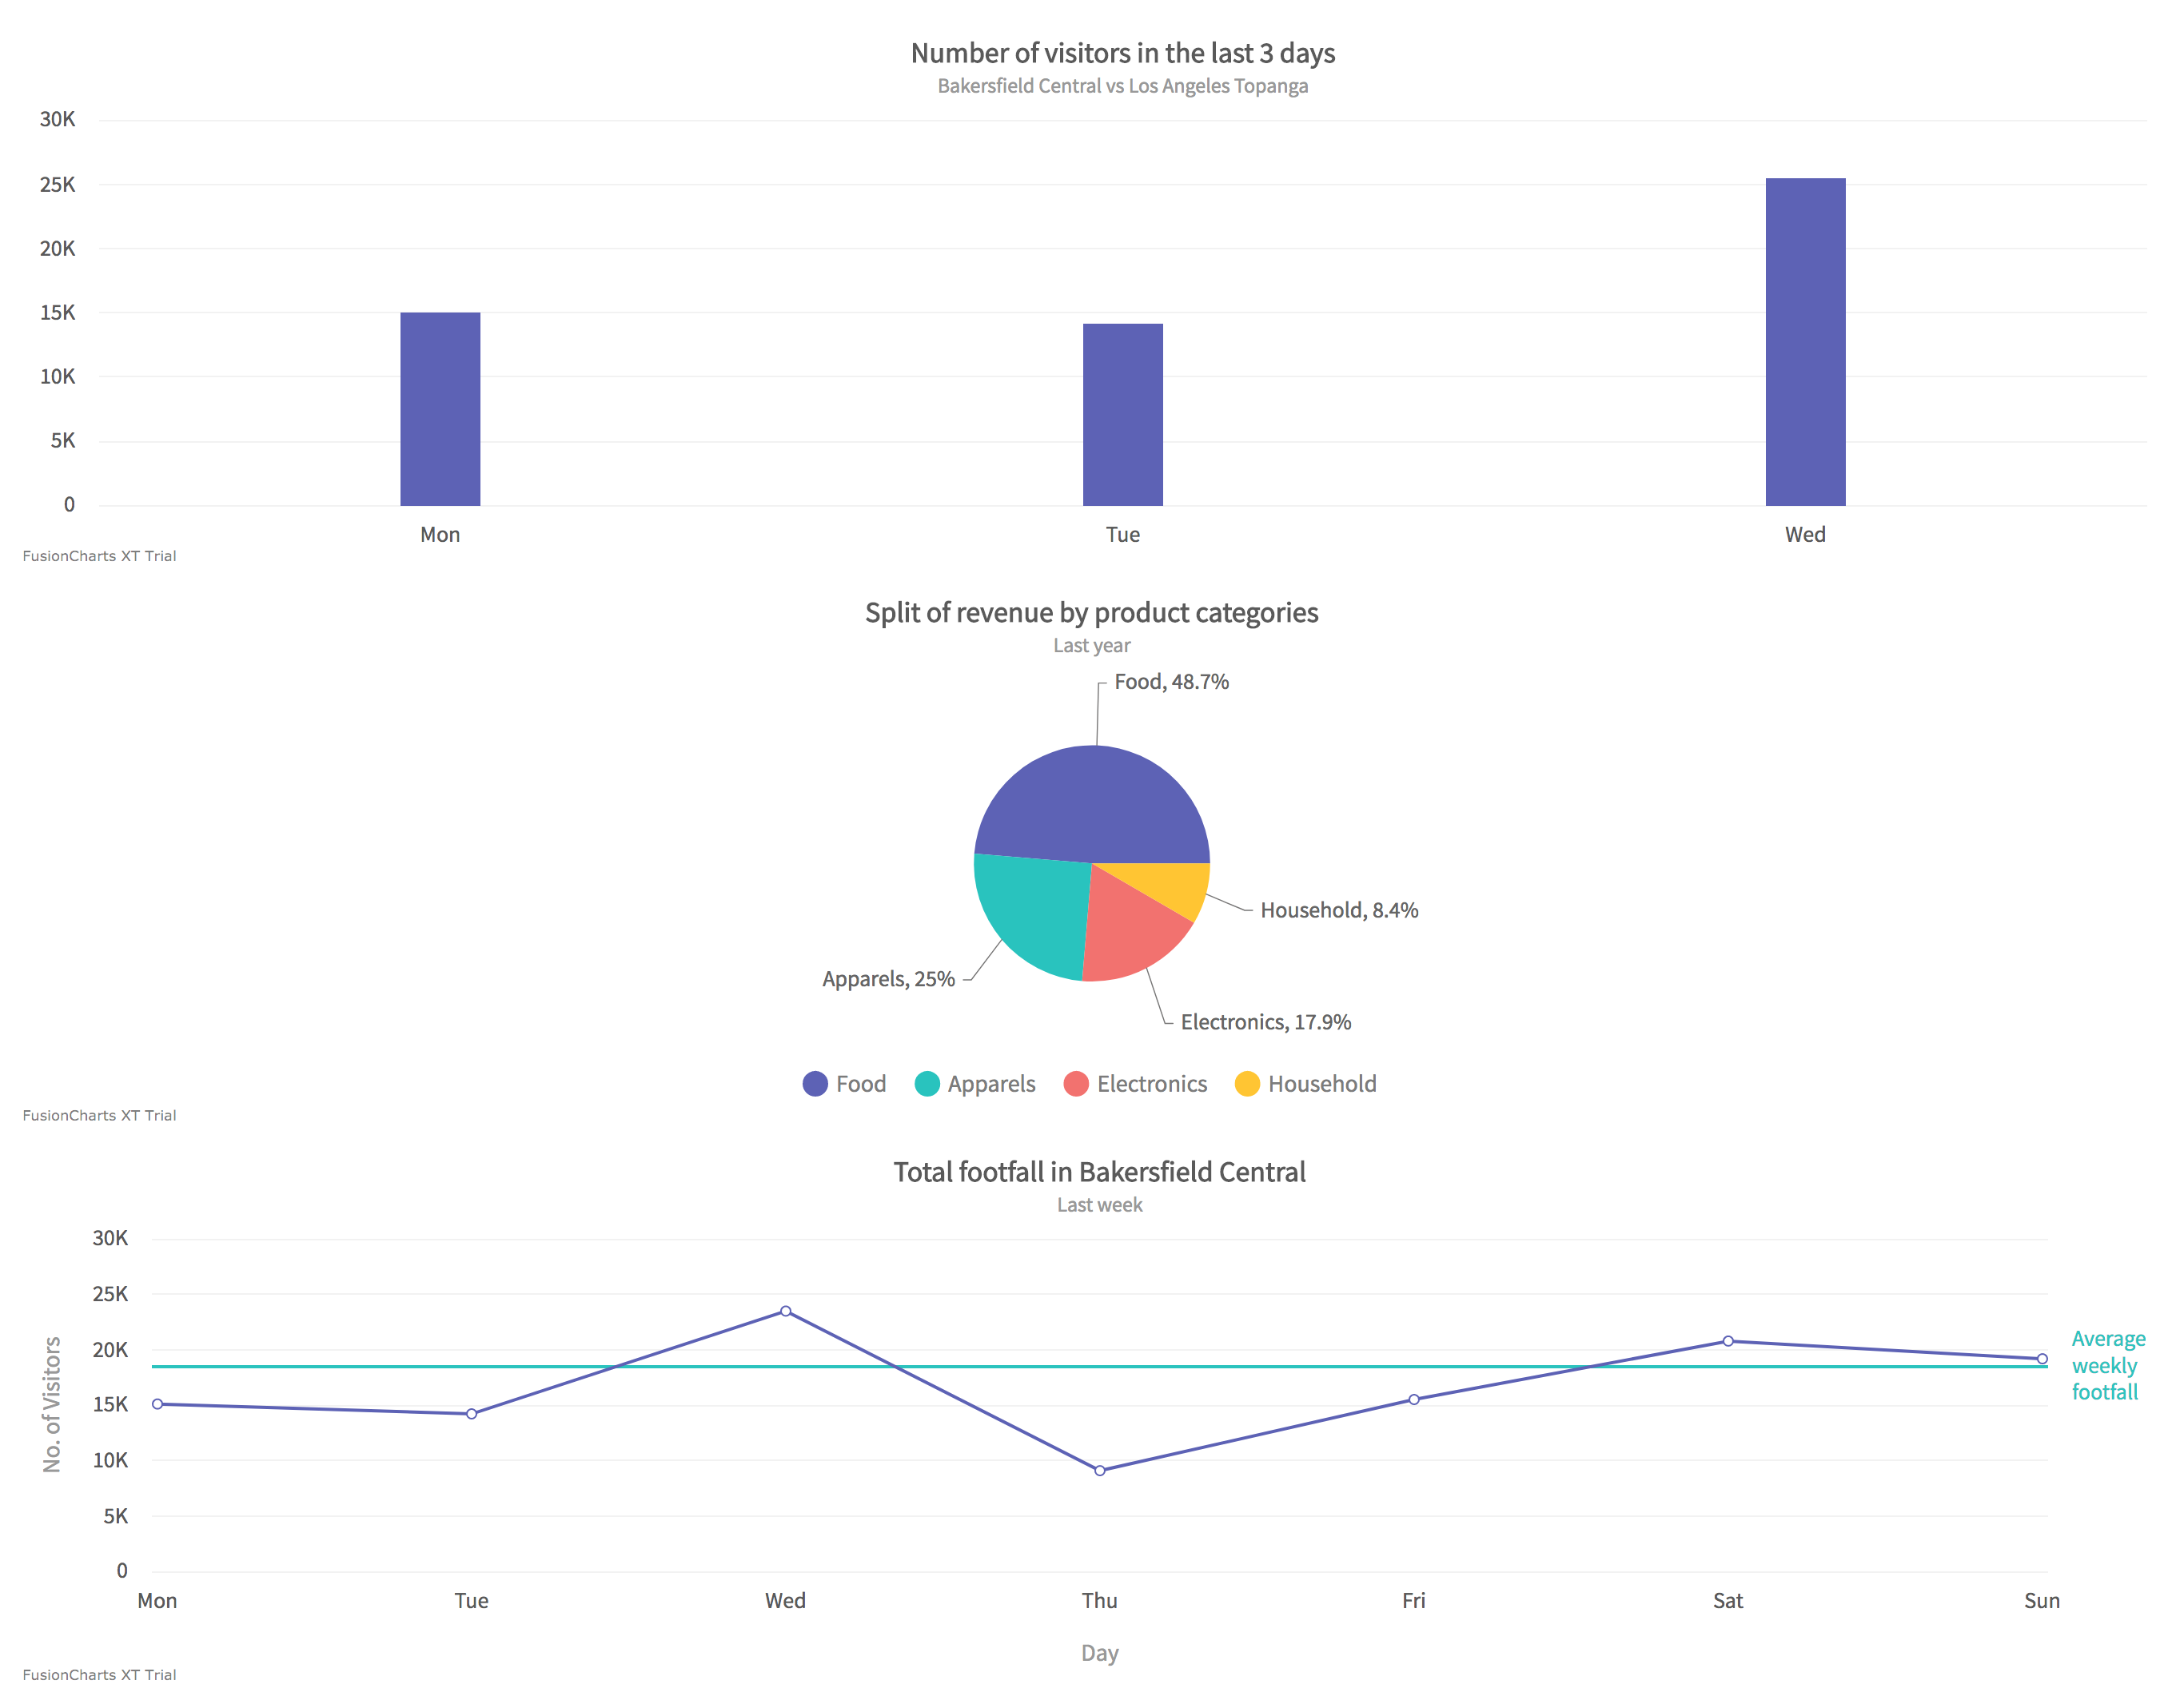
}Based on the above styling, the exported dashboard looks like the image below:

You can use frameworks like Bootstrap to style the template and make the exported dashboard look even better.