Installation of FusionCharts XT merely involves copying and pasting the SWF files and the JavaScript files from the package into any of your folders.
Installation of FusionCharts XT for your web application is just a two-step affair:
- Create a folder named FusionCharts in the root of your application (though, it is not mandatory to name the folder as FusionCharts or create it under the root folder. However, it organizes things a lot more, as all the pages within your website can now access the common set of charts).
- Copy all the SWF and JavaScript files from Download Package > Charts folder and paste it in FusionCharts folder.
If you are also using charts from PowerCharts 3.2 or earlier version, you will need to download or update to the latest PowerCharts pack and copy FusionCharts.HC.PowerCharts.js from the Charts folder of the downloaded PowerCharts pack.
Installation Complete. There's no more step involved. You're now ready to use FusionCharts XT in your web application.
If you want to create charts on your local machine, follow the steps below:
- Create a folder named FusionCharts inside your working folder. Again note that, it is not mandatory to name the folder as FusionCharts or create it as a new folder. However, doing this way organizes things a lot more.
- Copy all the SWF and JavaScript files from Download Package > Charts folder and now paste it in FusionCharts folder.
- To enable communication between charts and JavaScript (like updating data, retrieving data, printing, exporting, event handling etc.) in your local machine, you need to setup Flash Player Global Security settings.
If the version of your Flash Player is 10.3 or above you will need to right click on the chart and select Global Settings... option from the right-click menu and do the following:
- Select Advanced tab
- Click Add to Trusted Zone button
- Add all the folder which contain the chart SWF files to this zone

To get a detailed step-by-step tutorial on the above, please click here.
If the version of your Flash Player is lower than 10.3, it can be done in five simple steps:
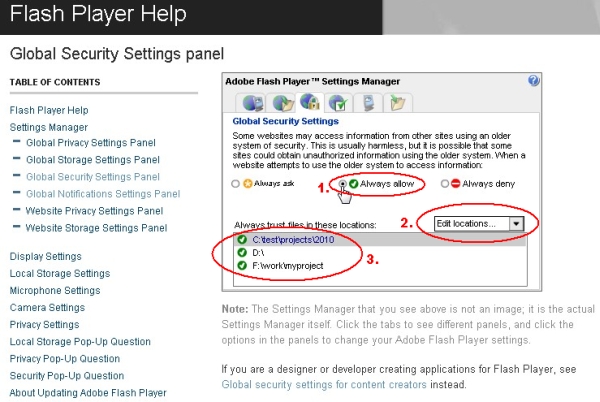
- Go online to Adobe Flash Player Settings Manager and choose the Global Security Settings panel
- Select the "Always allow" radio button on the top to allow security exceptions. This control is marked as "1" in the image below
- From the " Edit Locations..." drop down box, select "Add location..." option to bring up a dialog box. The drop down box is marked as "2" in the image below
- Now select Browse for folder... and browse to the location where you are keeping the chart SWF files
- After confirming your selection you should see the path of the exception added in area "3" of the image below
In case you wish to do this settings offline, you can ease this process by running a script file from the folder where you have kept the chart SWF files. Go to How to setup Flash Player Global Security Settings? page.
That completes the installation for FusionCharts XT. Now, all you need to do is build your XML or JSON data and HTML page, which we'll see in the next section.