Pure JavaScript charts also provide support for exporting to JPEG, PNG, PDF, SVG formats. Let's see how we can implement this feature.
Similar to FusionWidgets XT Flash-based charts, the JavaScript chart's export feature can be enabled by specifying exportEnabled="1" of the <chart> XML element or exportEnabled:"1" in JSON.
The following sample data enables the exporting feature of FusionWidgets XT (both Flash and JavaScript charts alike) using the default settings.
<chart exportEnabled='1' caption="Top 5 Sales Person" numberPrefix="$" isSliced="1" showBorder="0" bgColor="FFFFFF,FFFFFF">
    <set label='Alex' value='25000' />
    <set label='Mark' value='35000' />
    <set label='David' value='42300' />
    <set label='Graham' value='65300' />
    <set label='John' value='91300' />
</chart>
{
  "chart":{
    "exportenabled":"1",
    "caption":"Top 5 Sales Person",
    "isSliced":"1",
    "showBorder":"1",
    "numberprefix":"$",
    "bgColor":"FFFFFF,FFFFFF"
  },
  "data":[{
      "label":"Alex",
      "value":"25000"
    },
  "data":[{
      "label":"Mark",
      "value":"35000"
    },
    {
      "label":"David",
      "value":"42300"
    },
    {
      "label":"Graham",
      "value":"65300"
    },
    {
      "label":"John",
      "value":"91300"
    }
  ]
}
Once the exportEnabled attribute is set, a "Download" button will be displayed on the top right corner of your chart. This button, when clicked, will provide you a list of various export file formats thereby enabling you to download an image or PDF version of the chart.
The following image shows how the list will appear when the above data is used in a Pyramid chart.
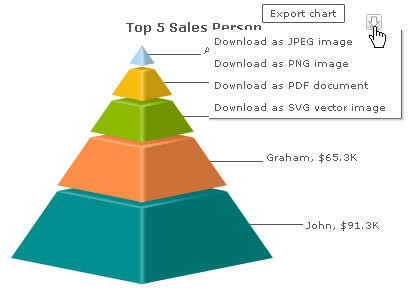
See it live!
During export of the pure JavaScript charts, the chart data is sent to external servers for processing and converting to image. User must have an active internet connection for this feature to work. In case you want to process the exported data on your own server, you may setup the chart to send the data to your own server. The details of how to do the same has been explained later on this page.
There is a possibility that the exported image/PDF appears slightly visually different with respect to colors and effects from your original chart that is being exported.
FusionWidgets XT Flash charts do not have a button to export the chart. Instead, upon right-clicking the Flash charts, users can select exporting options using a context-menu.
The export features of the JavaScript charts presently have limited customizability when compared to the Flash FusionWidgets XT. This is primarily owing to certain limitations of the present JavaScript export feature.
You can hide the "Download" button on the chart using the exportShowMenuItem="0". This will hide the export button. But, you will still be able to export the chart using its JavaScript API similar to FusionWidgets XT Flash charts.
You may want to set up the export service of the JavaScript charts on your own server. For this, you require PHP and Java running in your server. A JavaScript chart sends the export data to FusionCharts PHP Export Handler. It comprises of the following files (can be acquired from FusionCharts Download Pack > ExportHandlers > PHP folder) are required on your server:
- index.php (accepts initial export data and loads format specific export modules)
- Resources/FCExporter_SVG2ALL.php (Export module to export JavaScript charts with the help of Java Batik library)
- Apache Batik SVG Rasterizer library (download)
- (optional) Resources/FCExporter_RLE2IMG.php (Export module to export Flash charts to PNG/JPG)
- (optional) Resources/FCExporter_RLE2PDF.php (Export module to export Flash charts to PDF)
Server configurations required:
- Create a directory called temp in the same directory as index.php. If you have Linux or Unix servers, chmod this new directory to 777.
- Download the Apache Batik SVG Rasterizer library (as a compressed file) from here.
- Extract the Batik library in a temporary location and upload batik-rasterizer.jar and the entire lib directory to a location on your web server.
- Edit Resources/FCExporter_SVG2ALL.php and set the path to batik-rasterier.jar in the options section provided at the top of the php file as shown below:
// Options
define ('BATIK_PATH', 'batik-rasterizer.jar');
- Set the path to the index.php in the exportHandler attribute of your chart's XML/JSON data as shown below:
<chart ExportHandler='http://myserver.com/exporter/index.php' ...>
- Enable Export using exportEnabled ='1' in your chart's XML/JSON data.
If you want to save the exported file at your server, configure index.php to:
- Specify the location where the exported files will be saved
- Whether to overwrite existing files or to apply intelligent file naming when a file with the same name already exists
- Specify the web path of the saved file
 /* ----------------------- EXPORT PATH & URL -------------------------------- */     /**
        * IMPORTANT: You need to change the location of folder where
        *            the exported chart images/PDFs will be saved on your
        *			  server. Please specify the path to a folder with
        *			  write permissions in the constant SAVE_PATH below.
        */
      define ( "SAVE_PATH",  "./" );
      /* Place your folder path here.*//**
        *	IMPORTANT: This constant HTTP_URL stores the HTTP reference to
        *	           the folder where exported charts will be saved.
        *			   Please enter the HTTP representation of that folder
        *			   in this constant e.g., http://www.yourdomain.com/images/
        */
      define ( "HTTP_URL", "http://www.yourdomain.com/images/" );
      /* Define your HTTP Mapping URL here. *//**
*  OVERWRITEFILE sets whether the export handler will overwrite an existing file
*  the newly created exported file. If it is set to false the export handler will
*  not overwrite. In this case if INTELLIGENTFILENAMING is set to true the handler
*  will add a suffix to the new file name. The suffix is a randomly generated UUID.
*  Additionally, you add a timestamp or random number as additional suffix.
*
*/
define ( "OVERWRITEFILE", false );
define ( "INTELLIGENTFILENAMING", true );
define ( "FILESUFFIXFORMAT", "TIMESTAMP" ) ;// can be TIMESTAMP or RANDOM/* Define file over-write, auto-naming and naming suffix configuration here.*/