Throughout our previous examples, we had used the default shapes provided by FusionMaps XT(circle, arc, diamond or triangle) as our marker shapes and customized their border and background color. However, FusionMaps XT provides you with many more options for marker shapes like defining your custom shape and loading external images as icons. To do so, you'll need to use the SHAPES feature of markers, as explained here.
Before jumping to any code, let's see an example first.
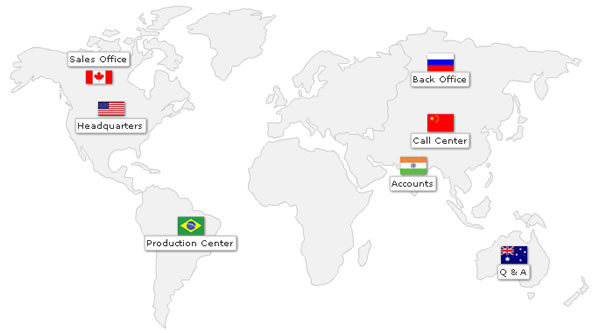
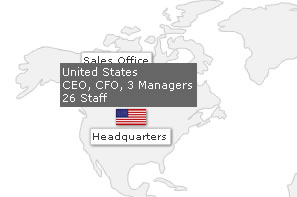
In the above map, we've used custom image icons to show various offices around the world. Also, we've used custom tool text for each marker to show more information, as shown below:
The XML code for this map can be reproduced as under:
<map animation='0' showShadow='0' showBevel='0' showLabels='0' showMarkerLabels='1' fillColor='F1f1f1' borderColor='CCCCCC' baseFont='Verdana' baseFontSize='10' markerBorderColor='000000' markerBgColor='FF5904' markerRadius='7' legendPosition='bottom' useHoverColor='0' showToolTip='0' showMarkerToolTip='1' > <data> <entity id='NA' /> <entity id='SA' /> <entity id='EU' /> <entity id='AS' /> <entity id='AF' /> <entity id='AU' /> </data> <markers> <definition> <marker id='CA' x='116.65' y='94.85' label='Sales Office' labelPos='top'/> <marker id='US' x='131.57' y='133.22' label='Headquarters' labelPos='bottom'/> <marker id='CN' x='532.3' y='150.68' label='Call Center' labelPos='bottom'/> <marker id='BR' x='228.55' y='276.03' label='Production Center' labelPos='bottom'/> <marker id='AU' x='621.83' y='311.21' label='Q & A' labelPos='bottom'/> <marker id='RU' x='532.3' y='76.73' label='Back Office' labelPos='bottom'/> <marker id='IN' x='499.26' y='202.5' label='Accounts' labelPos='bottom'/> </definition> <shapes> <shape id='USMap' type='image' url='Resources/us_flag.jpg' labelPadding='12' /> <shape id='CAMap' type='image' url='Resources/canada_flag.jpg' labelPadding='12' /> <shape id='CNMap' type='image' url='Resources/china_flag.jpg' labelPadding='12' /> <shape id='BRMap' type='image' url='Resources/brazil_flag.jpg' labelPadding='12' /> <shape id='AUMap' type='image' url='Resources/aus_flag.jpg' labelPadding='12' /> <shape id='RUMap' type='image' url='Resources/rus_flag.jpg' labelPadding='12' /> <shape id='INMap' type='image' url='Resources/ind_flag.jpg' labelPadding='12' /> </shapes> <application> <marker id='CA' shapeId='CAMap' toolText='Canada<BR>2 Managers<BR>11 Staff'/> <marker id='US' shapeId='USMap' toolText='United States<BR>CEO, CFO, 3 Managers<BR>26 Staff'/> <marker id='CN' shapeId='CNMap' toolText='China<BR>1 Manager<BR>7 Support Staff'/> <marker id='BR' shapeId='BRMap' toolText='Brazil<BR>COO, 2 Managers<BR>32 Factory Staff'/> <marker id='AU' shapeId='AUMap' toolText='Australia<BR>1 Manager<BR>(Outsourced Agency)'/> <marker id='RU' shapeId='RUMap' toolText='Russia<BR>1 Manager<BR>6 Staff'/> <marker id='IN' shapeId='INMap' toolText='India<BR>1 Manager<BR>5 Accountants'/> </application> </markers> <styles> <definition> <style name='TTipFont' type='font' isHTML='1' color='FFFFFF' bgColor='666666' size='11'/> <style name='HTMLFont' type='font' color='333333' borderColor='CCCCCC' bgColor='FFFFFF'/> <style name='myShadow' type='Shadow' distance='1'/> </definition> <application> <apply toObject='MARKERS' styles='myShadow' /> <apply toObject='MARKERLABELS' styles='HTMLFont,myShadow' /> <apply toObject='TOOLTIP' styles='TTipFont' /> </application> </styles> </map>
Though the XML looks pretty long because of a lot of things we've put up in this, we'll concentrate on just the custom shapes part. You'll see that we've introduced the new <shapes> and its children <shape> elements in this code. These elements help you define custom shapes that markers on your map can use.
Note that it's not necessary to define <shapes> or <shape> to use markers. If not defined, you can still use the default marker shapes provided by FusionMaps XT.
Each custom shape needs to be present as a <shape> element (inside <shapes> element). It can have a lot of attributes as explained below.
The <shape> element can have a lot of functional and cosmetic attributes. Of all of them, only the following are compulsory:
- ID - Each shape needs to be given a unique Id. During application, you'll directly refer to the ID of each shape to plot it on the map.
- type - Type specifies what kind of shape the marker will draw as. Valid values are circle, arc, polygon or image. So, if you want to create a pentagon, select polygon for this attribute and then later set sides to 5.
- url - If you're using an image marker shape, you necessarily need to specify it's URL. FusionMaps XT can load GIF, JPEG and PNG files from the same sub-domain only (owing to cross browser security restrictions).
Additionally, you can set the following properties for each marker shape:
- sides - If you've opted to plot a polygon shaped marker, you can specify the number of sides the polygon will have, using this attribute. Valid values are 3-20.
- alpha - This attribute lets you configure the alpha of the entire marker.
- labelPadding - This attribute lets you set the distance (in pixels) between your marker shape and the marker label.
- fillColor - Using this attribute, you can specify the fill color for the marker shape (hex code without #). If you specify a comma separated list of hex codes (without #), FusionMaps XT will use those colors to form a gradient.
- fillAlpha - Used to specify the fill alpha. In case of gradients, you'll need to specify a comma separated list of alpha.
- fillRatio - If you're using gradient fills for the marker, this attribute lets you set the ratio (on a scale of 0-100) for the gradient component colors.
- fillAngle - If you're using gradient fills for the marker, this attribute lets you set the angle for the gradient.
- fillPattern - If you're using gradient fills for the marker, this attribute lets you set the pattern for gradient - valid values are "linear" or "radial".
- showBorder - Whether to show border for the marker shape?
- borderColor - Border color for the marker shape
- borderThickness - Border thickness for the marker shape
- borderAlpha - Border alpha for the marker shape
- radius - In case of arc, circle or polygon, this attribute lets you set the radius of the same.
- innerRadius - In case of arc, this attribute lets you set the inner radius of the same.
- startAngle - In case of arc or polygon, this attribute lets you set the starting draw angle.
- endAngle - In case of arc, this attribute lets you set the ending draw angle.
And, the following attributes apply only if you're plotting an image marker shape:
- xScale - This attribute lets you dynamically re-scale the x-scale of your images after they've been loaded. Valid range is 0-1000.
- yScale - This attribute lets you dynamically re-scale the y-scale of your images after they've been loaded. Valid range is 0-1000.
- vAlign - When using an image marker, you can specify how the image will vertically align with respect to the marker's y position using this attribute. Valid values are "top", "middle" and "bottom". For markers which are simple icons, you can use the middle vertical align. In that case, the image will vertically be at the center position of the marker. However, if you've an image icon like a pin-point or a needle with its pointer faced downwards, you'll need to set the vertical alignment position to "top", so that the pointer exactly points to the given marker location. Horizontally, the images are always aligned centrally.