If you do not wish the exported image to be sent back to browser, but instead want it to be saved on the server, you need to make the following changes from the previous example, where the file was downloaded:
- Open the server-side export handler and configure the path of write-enabled folder in which images will be saved, as well as set the HTTP Url representation of that folder in the code. The handlers also allow a few advanced configuration with respect to file naming.
- Change exportAction='save' in the XML
- Remove exportTargetWindow attribute from your XML. As there are no downloads returned, there is no question of which window to return it in
- Create a JavaScript method in your web page that gets called once the image has been saved on server. Specify the name of this function in exportCallback attribute of XML. If you do not specify any names here, by default, a JavaScript function named FC_Exported is called.
Let's first start with Step 1, where you configure the path of your temporary save folder on server and set the HTTP reference for the same.
In the export handler, you'll need to configure the following:
- Configure the folder on your server where the images/PDFs would be saved. Make sure that this folder has proper write permissions, as otherwise the export handlers would not be able to write to the file system. For checking and setting security settings on your server, consult the web server's documentation (i.e., IIS, Apache etc. docs)
- You need to specify the HTTP mapping of this folder path, if you need your JavaScript functions to directly access this saved images. For example, say you saved your image on the server at c:\inetpub\wwwroot\yoursite\temp (or /users/{you}/www/temp) and the images saved here can be reached through http://www.yoursite.com/temp, you need to specify the Url "http://www.yoursite.com/temp" as mapping HTTP Url for this folder path.
- Configure the file name settings - by default, FusionCharts export handlers uses GUID for automatic file name generation. At the end of this, you can opt to append current timestamp of server, or a random number to avoid over-riding of any files (in case of thousands of concurrent files being saved at a given second). You can also configure whether the files will be over-written in that folder or not (which is the default).
Depending on which export handler you're using, follow the steps below:
If PHP:
Open FCExporter.php, scroll down, and make the changes in following lines:
/* ----------------------- EXPORT PATH & URI -------------------------------- */     /**
        * IMPORTANT: You need to change the location of folder where
        *            the exported chart images/PDFs will be saved on your
        *			  server. Please specify the path to a folder with
        *			  write permissions in the constant SAVE_PATH below.
        */
      define ( "SAVE_PATH",  "./" );
      /* Place your folder path here.*//**
        *	IMPORTANT: This constant HTTP_URI stores the HTTP reference to
        *	           the folder where exported charts will be saved.
        *			   Please enter the HTTP representation of that folder
        *			   in this constant e.g., http://www.yourdomain.com/images/
        */
      define ( "HTTP_URI", "http://www.yourdomain.com/images/" );
      /* Define your HTTP Mapping Url here. *//**
*  OVERWRITEFILE sets whether the export handler would overwrite an existing file
*  the newly created exported file. If it is set to false the export handler would
*  not overwrite. In this case if INTELLIGENTFILENAMING is set to true the handler
*  would add a suffix to the new file name. The suffix is a randomly generated UUID.
*  Additionally, you add a timestamp or random number as additional suffix.
*
*/
define ( "OVERWRITEFILE", false );
define ( "INTELLIGENTFILENAMING", true );
define ( "FILESUFFIXFORMAT", "TIMESTAMP" ) ;// can be TIMESTAMP or RANDOM
/* Define file over-write, auto-naming and naming suffix configuration here. */
Open FCExporter.aspx.cs and edit the following:
/// <summary>
        /// IMPORTANT: You need to change the location of folder where
        /// the exported chart images/PDFs will be saved on your
        /// server. Please specify the path to a folder with
        /// write permissions in the constant SAVE_PATH below.
        ///
        /// Please provide the path as per ASP.NET path conventions.
        /// You can use relative or  absolute path.
        ///
        /// Special Cases:
        ///     '/' means 'wwwroot' directory.
        ///     '. /' ( without the space after .) is the directory where the FCExporter.aspx file resides.
        ///
        /// Absolute Path :
        ///
        ///     can be like this : "C:\\myFolders\\myImages"
        ///     ( Please never use single backslash as that would stop execution of the code instantly)
        ///     or "C:/myFolders/myImages"
        ///
        ///     You may have a // or \ at end : "C:\\myFolders\\myImages\\"  or "C:/myFolders/myImages/"
        ///
        ///     You can also have mixed slashes : "C:\\myFolders/myImages"
        ///
        ///
        /// </summary>
        /// directory where the FCExporter.aspx file resides

      private const string SAVE_PATH = "./";

      /* Place your folder path here.*/
   /// <summary>
        /// IMPORTANT: This constant HTTP_URI stores the HTTP reference to
        /// the folder where exported charts will be saved.
        /// Please enter the HTTP representation of that folder
        /// in this constant e.g., http://www.yourdomain.com/images/
        /// </summary>
        private const string HTTP_URI = "http://www.yourdomain.com/images/";
     /* Define your HTTP Mapping Url here. */
        /// <summary>
        /// OVERWRITEFILE sets whether the export handler would overwrite an existing file
        /// the newly created exported file. If it is set to false the export handler would
        /// not overwrite. In this case, if INTELLIGENTFILENAMING is set to true the handler
        /// would add a suffix to the new file name. The suffix is a randomly generated GUID.
        /// Additionally, you add a timestamp or a random number as additional suffix.
        /// </summary>
        private bool OVERWRITEFILE = false;
        private bool INTELLIGENTFILENAMING = true;
        private string FILESUFFIXFORMAT = "TIMESTAMP";// value can be either 'TIMESTAMP' or 'RANDOM'
/* Define file over-write, auto-naming and naming suffix configuration here. */
Open fusioncharts_export.properties file present in the Classes directory and make changes in the following values there.
#Please specify the path to a folder with write permissions relative to web application root
SAVEPATH=./images/
#This constant HTTP_URI stores the HTTP reference to
#the folder where exported charts will be saved.
#Please enter the HTTP representation of that folder
#in this constant e.g., http://www.yourdomain.com/images/
HTTP_URI=http://www.yourdomain.com/images/
#OVERWRITEFILE sets whether the export handler would overwrite an existing file
#the newly created exported file. If it is set to false the export handler would
#not overwrite. In this case if INTELLIGENTFILENAMING is set to true the handler
#would add a suffix to the new file name. The suffix is a randomly generated UUID.
#Additionally, you can add a timestamp or random number as additional prefix.
OVERWRITEFILE=false
INTELLIGENTFILENAMING=true
FILESUFFIXFORMAT=TIMESTAMP
Open lib/fusioncharts/exporter/properties.rb and make changes in the following values there.
 #IMPORTANT: You need to change the location of folder where
#  the exported chart images/PDFs will be saved on your
#   server. Please specify the path to a folder with
#   write permissions in the constant SAVE_PATH below.
# This path is relative to the web application root
@@SAVEPATH = "./images/"

#Used to show as message in SWF
#This constant HTTP_URI stores the HTTP reference to
#the folder where exported charts will be saved.
#Please enter the HTTP representation of that folder
#in this constant e.g., http://www.yourdomain.com/images/
@@HTTP_URI = "http://www.yourdomain.com/images/"
 =begin
        ---------------------------- Export  Settings -------------------------------
        OVERWRITEFILE sets whether the export handler would overwrite an existing file
        the newly created exported file. If it is set to false the export handler would
        not overwrite. In this case if INTELLIGENTFILENAMING is set to true the handler
        would add a suffix to the new file name. The suffix is a randomly generated UUID.
        Additionally, you add a timestamp or random number as additional suffix.
        =end
        #Values allowed are true or false
        @@OVERWRITEFILE = false
        #Values allowed are true or false
        @@INTELLIGENTFILENAMING = true
        #Values allowed are "TIMESTAMP" or "RANDOM"
      @@FILESUFFIXFORMAT = "TIMESTAMP"
As previously mentioned, we just need to do the following changes to XML:
<chart yAxisName='Sales Figure' caption='Top 5 Sales Person' numberPrefix='$' useRoundEdges='1' bgColor='FFFFFF,FFFFFF' showBorder='0' exportEnabled='1' exportAtClient='0' exportAction='save' exportHandler='http://www.yoursite.com/ExportHandlers/FCExporter.php'>
     <set label='Alex' value='25000'  />
     <set label='Mark' value='35000' />
     <set label='David' value='42300' />
     <set label='Graham' value='35300' />
     <set label='John' value='31300' />
</chart>
This instructs the chart to save the exported image on server.
Note that we've not provided a file name here. If not provided, it takes the default value of "FusionCharts". You can, however, specify your file name using exportFileName attribute of <chart> element. However, since in this case, the server path could already have another file name with the same name, the following conditional logic takes place:
- If the folder path specified on server doesn't have a file name that matches this file, the image/PDF is created using this file name.
- However, if another file with the same name exists, the over-writing is dependent on whether you've changed the over-write flag (as described above) in your server-side export handler.
- If you've set it to yes, the export handler blindly over-writes the old file.
- If you've set it no, the new name depends on whether you've opted for smart auto-naming.
- If yes, the new name is decided by combining your specific file name + GUID + time stamp or random value (as chosen by value)
- If auto-naming is set to off (when over-write is set to off as well), the export-handler throws an error, as it doesn't have any option left.
Now that everything else is setup, the only thing left is to define a JavaScript callback function handler. This callback function is invoked when the chart gets a response back from server - in both success and failure cases.
To specify your callback function to chart, you need to specify the function name as exportCallback attribute of <chart> element as under:
<chart ... exportCallback='myCallBackFunction' ...>
And you then need to define this function in your JavaScript code. However, if you do not define any call back function in your XML, the default callback function FC_Exported is invoked. In either case, an object is passed to the function as FC_Exported(objRtn) or myCallBackFunction(objRtn), which contains the following parameters (returned from server):
- statusCode - Has the value of 1 in case of success, and 0 in case of failure.
- statusMessage - In case of failure, this parameter contains a string description of the error (returned by server)
- fileName - If saving was successful, this parameter contains the HTTP reference to the image/PDF file saved on server
- width & height - If saving was successful, these parameters contain the width/height of saved image. Else, they contain 0.
- DOMId - DOMId of the chart that was successfully exported.
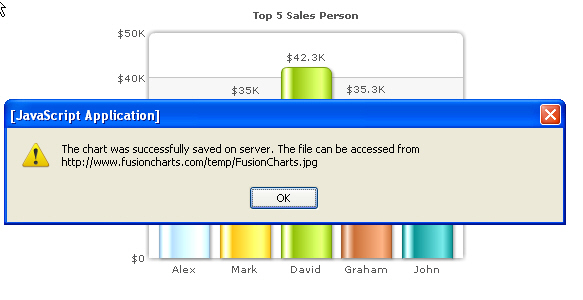
Let's quickly see an example code where a callback function has been implemented. In this example, once we receive the confirmation from server, we just show it in a JavaScript alert.
<html>
  <body>
      <script language="JavaScript" src="../../FusionCharts/FusionCharts.js"></script>
      <script type="text/javascript">
           //Callback handler method which is invoked after the chart has saved image on server.
           function FC_Exported(objRtn){
              if (objRtn.statusCode=="1"){
                 alert("The chart was successfully saved on server. The file can be accessed from " + objRtn.fileName);
              }else{
                 alert("The chart could not be saved on server. There was an error. Description : " + objRtn.statusMessage);
              }
           }
      </script>
  </head>
  <body bgcolor="#ffffff">
     <div id="chartdiv" align="center">The chart will appear within this DIV. This text will be replaced by the chart.</div>
     <script type="text/javascript">
           // Create the chart. Make sure registerWithJS is set to 1, else callback cannot happen.
           var myChart = new FusionCharts( "../../FusionCharts/Column2D.swf", "myChartId", "400", "300", "0", "1" );
           myChart.setXMLUrl("SaveData.xml");
           myChart.render("chartdiv");
     </script>
  </body>
</html>
In the above code, note how the default FC_Exported method is called once the server-side export of chart is completed.
When you run this code, you'll get the following output.
Here, since we've just one chart in the page, we didn't put any if-then block to check the DOMId of the chart. However, if you've multiple charts in a page, you can do use if-then statements (based on DOMId string match) to take a different course of action when each chart in the page has been saved.